Different views of the Lifecycle Planning Worksheet
FactBoxes in the Lifecycle Planning Worksheet
Charts in the Lifecycle Planning Worksheet
To delete the item in the Lifecycle Planning Worksheet
To clear the Lifecycle Planning Worksheet
To update the Lifecycle Planning Worksheet
To search for items in the worksheet
- Click the
 icon, enter Lifecycle Worksheets, and select the relevant link.
 - Click the Name of an existing Lifecycle Planning Worksheet, or click the Lifecycle Planning Worksheet action to open the selected Lifecycle Planning Worksheet.
- Click the Process action, then Get Items to populate the Lifecycle Planning Worksheet with items that belong to the season associated with the selected worksheet. For more details see How to: Set Up a Lifecycle Planning Worksheet.
Note: The Process action menu has several actions you can use when you are populating the worksheet.
The following table describes the fields in the worksheet:
| Field | Description |
|---|---|
| Name | The name of the Lifecycle Planning Worksheet. |
| View | This field specifies if the Lifecycle Planning Worksheet is in Tree view or List view. |
| Hierarchy Code | This field specifies the hierarchy structure that is used to display the items in the Lifecycle Planning Worksheet. |
| Store | This field specifies the store that will be used to filter the data. |
| Season | This field specifies the Season Code that is assigned to the Lifecycle Planning Worksheet. |
| Starting Date | This field shows the starting date of the season. |
| Ending Date | This field shows the ending date of the season. |
| Replenishment Template Code | This field specifies the Replenishment Template Code that is linked to the Lifecycle Planning Worksheet. The items to be calculated in the related replenishment journal will be taken from the Lifecycle Planning Worksheet. |
You can filter item(s) on a worksheet with the item group filters. Note: This filtering feature is only applicable to List view. The filters are:
| Field | Description |
|---|---|
| Division Code | This field specifies the division that will be used to filter the items included in Lifecycle Planning. |
| Item Category Code | This field specifies the item category that will be used to filter the items included in Lifecycle Planning. |
| Retail Product Code | This field specifies the retail product group that will be used to filter the items included in Lifecycle Planning. |
| Item No. | This field specifies the item number that will be used to filter the item included in Lifecycle Planning. |
The fields in the worksheet lines are explained in the list below:
| Field | Description |
|---|---|
| No. | This field shows the number of the item in the Lifecycle Planning Line. |
| Description | This field shows the description of the item in the Lifecycle Planning Line. |
| Division Code | This field shows the division code of the item in the Lifecycle Planning Line. |
| Item Category Code | This field shows the item category code of the item in the Lifecycle Planning Line. |
| Retail Product Code | This field shows the retail product group code of the item in the Lifecycle Planning Line. |
| Lifecycle Curve Code | This field shows the lifecycle curve code of the item in the Lifecycle Planning Line. |
| Inventory | This field shows the inventory (at the store) minus the number of sold items included in transactions that belong to open statements. |
| Variant Availability | This field shows zero if the item does not have variants. If the item has variants, it displays the percentage of variants that have stock at the selected store. You can drill down from Variant Availability to open the Retail Item-Variant Dimension-Location Availability page that displays the item / variants availability by location. |
| Days of Stock Cover | This field shows an estimate of the number of sales days that can be covered with the current inventory. This is calculated by dividing the inventory of the item with the item’s Average Daily Seasonal Sales or based on Lifecycle Curve. |
| Average Daily Seasonal Sales | This field shows the number of items sold on average per day from the beginning of the sales period within the season (the Days for Sale field in the Item Lifecycle Factbox displays the number of days within the season that the item has been on sale). This average value is used to estimate the Days of Stock Cover. |
| End of Life Inventory | This field shows an estimate of the stock level at the end of the season. |
| Unit Cost | This field shows the item’s unit cost. |
| Original Price | This field shows the item’s first price for the selected store. If there is no store selected, the field displays the original price for all price groups. |
| Current Price | This field shows the current item price for the selected store, or the current price for all price groups. |
| Profitability % | This field shows the ratio between the difference of Current Price and Unit Cost over Current Price. |
| Sell Through % | This field shows the ratio of the item’s Sales (Qty.) from the beginning of the season over the sum of the item’s Net Change at the beginning of the season plus the item’s Sales (Qty.) from the beginning of the season. This is the ratio of the sales at the season over inventory at the season. |
| Sell Through % (Expected) | This field shows the expected Sell Through % based on start date, work date, and end date, and a Lifecycle Curve, if assigned to the item. |
| Enabled Offers | This field shows the number of enabled offers that the item belongs to. Drilling down into this number opens the page Periodic Discount List showing the offers behind the number. |
| New Discount % |
This field specifies a value that you select to represent the discount percentage that you want to set on the item in a selected offer. The procedure of this is discussed in the Discount & Markdown FactBox section. |
| New Price | This field specifies a value that you select to represent the item’s new price (including VAT). The process of setting the new price is discussed in the Discount & Markdown FactBox section. |
Note: If a store is selected, all the inventory quantities are calculated at the store’s corresponding location. If no store value is selected, the inventory quantities are the totals over all possible stores.
Different views of the Lifecycle Planning Worksheet
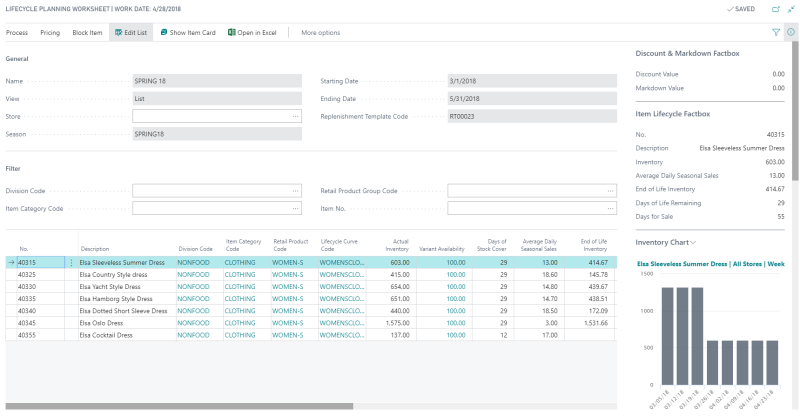
You can present the Lifecycle Planning Worksheet in Tree view or List view, depending on the option you select in the View column in the Lifecycle Worksheets page.
List View - Displays the Lifecycle Planning Lines in a list structure:
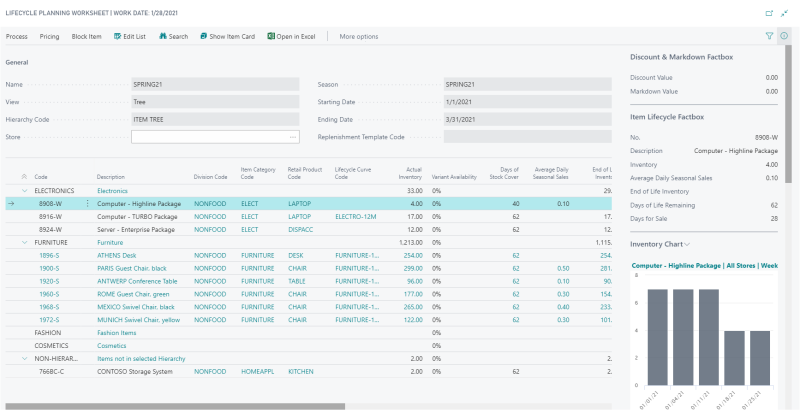
Tree View - Displays the Lifecycle Planning Lines in a tree structure, in the form of:
- Division - Item Category - Retail Product Group - Item
- Item Hierarchy Node - Item (if a Hierarchy Code is defined)
The Tree view displays the data by item group or item hierarchy group. This makes viewing data in the Lifecycle Planning Worksheet much more flexible and intuitive.
FactBoxes in the Lifecycle Planning Worksheet
On the right-hand side of the Lifecycle Planning Worksheet, there are FactBoxes with information related to the worksheet lines.
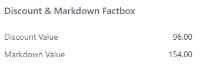
- If you choose to add an item to a discount offer by entering a value in the field New Discount %, the Discount Value in the Discount & Markdown FactBox displays the total value of such discounts before the discount lines are created. If you change the item’s price by entering a value in the New Price field, the Markdown Value in the FactBox displays the total value of the price changes suggested in the worksheet before the new sales price lines are created.
-
After adding the items to a discount offer, the New Discount % values are set to zero, hence the Discount Value in the FactBox is also set to zero. After adding a new sales price to an item, the Markdown Value is set to zero. See How to: Set Up Item Pricing and Item Status for more information on how the new prices and discount values can be applied to the items.
-
Item Lifecycle FactBox
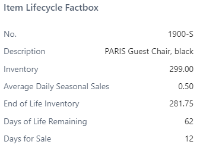
The Item Lifecycle Factbox shows information on the item in the selected line.
-
The Days of Life Remaining represents the number of days left of the season associated with the selected worksheet. Days for Sale displays the number of days within the season period that the item has been on sale. Other fields in this Factbox are the same as in the worksheet lines and are discussed in the field list above.
Charts in the Lifecycle Planning Worksheet
The Lifecycle Planning Worksheet has various charts that offer graphical overviews of the item's inventory and sales development. For more information see Charts in the Lifecycle Planning Worksheet.
To delete the item in the Lifecycle Planning Worksheet
- Click the Process - Delete Item action to delete the selected item in the worksheet.
To clear the Lifecycle Planning Worksheet
- Click the Process - Clear Worksheet action to delete all the lines in the worksheet.
To update the Lifecycle Planning Worksheet
- Click the Process - Update Lines action to update the worksheet lines. This action updates all the fields in the worksheet lines, as well as the FactBox values.
To filter on a store
If you have a store assigned in Retail Users, the store filtering is done with regard to that store and the Store lookup is hidden in the Lifecycle Planning Worksheet.
If you do not have an assigned store in Retail Users, you can filter on Store via the Store lookup. All calculations are then done with regard to the selected store filtering.
To search for items in the worksheet
- Click the Search action to move the cursor to the first record of the search result in the Lifecycle Planning Lines, based on the defined item group filters or item hierarchy filters. Note: The Search action is only enabled for a Lifecycle Planning Worksheet that is presented in Tree view.
See also
Charts in the Lifecycle Planning Worksheet
How to: Set Up Item Pricing and Item Status