You can use web templates to represent your item and deal POS Menus.
Import Web Templates
If you are not working with a demo data company, you must import web templates for Clienteling. The web templates come with the toolbox installation and the default path is C:\Program Files (x86)\LS Retail\NAV\Web Templates\Templates.
To import the templates
- Be in Business Central.
- Click the
 icon, enter POS Web Templates, and select the relevant link.
 - In the POS Web Templates list, click Actions - Import.
- Locate your Web Template folder (default location is C:\Program Files (x86)\LS Retail\NAV\Web Templates) and import a folder named Templates.
The web templates should now be imported to your database and you can start working with them.
There are two web templates that you can use for your POS Menus:
- #BRICKVIEW
- #BRICKVIEWHOSP
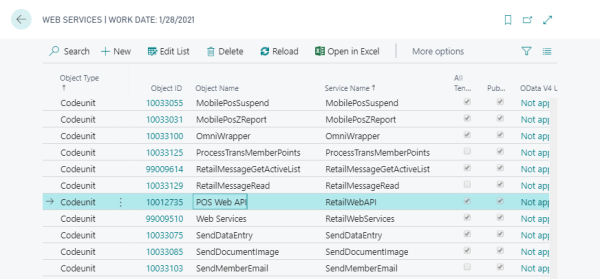
Add Web Service
Add RetailWebAPI Web Services in the Web Services List:
Create browser controls
First, you must create new browser controls for the interface profile in use. The browser controls you need are for:
- Brick View - which contains all nodes in the Item Hierarchy
- Item Details - for the leaves in the Item Hierarchy (the items)
- Product Compare - to be able to compare two items and their attributes.
To create new browser controls
- Open the interface profile in use.
- Click the Lists action, then Browser Control List.
- Click the New action to create a new control.
- Enter a Control ID, for example #RETAILHIERARCHY.
- Add a Description, for example Retail Hierarchy.
- In the URL field, select the #BRICKVIEW or #BRICKVIEWHOSP template from the drop-down list.
Repeat these steps for the Item Details browser control, and use the Web Template #ITEMDETAILS.
Repeat these steps for the Product Compare browser control, and use the Web Template #PRODUCTCOMPARE.
The browser control in the demo data are called #RETAILHIRARCHY (uses the #BRICKVIEW web template), #ITEMDETAILS, and #PRODUCTCOMPARE.
The browser control in the demo data using the #BRICKVIEWHOSP web template is called #H-FINE-CL.
Create panels
To be able to open the Item Details and Product Compare browser controls in a window on the POS, you need to create new panels, one panel for the Item Details window and one for the Product Compare.
To create the panels (Item Details and Product Compare)
- Open the interface profile in use.
- Click Lists, and then Panel List.
- Click the New action to create a new panel.
- Add the relevant browser control on the POS Panel Control Lines FastTab.
Note: The #BRICKVIEW and the #BRICKVIEWHOSP web templates open the panel #ITEMDETAILS for the Item Detail panel and the #PRODUCTCOMPARE panel for the product compare. If you name your panels differently, you need to replace these panel names in the web template (locate the SHOWPANELMODAL command and replace the panel name).
The panels in the demo data are called #ITEMDETAILS and #PRODUCTCOMPARE.
Set up in POS
Now you can
- add the Retail Hierarchy browser control directly into a section in a POS panel by adding it on a POS Panel Control lines in the panel.
POS terminal P0029 in the demo data uses the #BRICKVIEWHOSP web template for its item and deal POS menu. The browser control #H-FINE-CL (with the #BRICKVIEWHOSP web template) is located in the #POS panel (the main sales panel) in the interface profile used by the POS terminal.
Edit the Web Templates
The Web Templates for Clienteling can be edited by a web developer directly in the Business Central client BackOffice. You can edit HTML, Javascript, and CSS code in the template.
Tip: To see a preview of a changed code, simply click outside the edited field and the Web Template preview will be updated.
Tip: If you do not get a preview of the Web Template, run the POS client once and try again. This activates the RetailWebAPI web service.
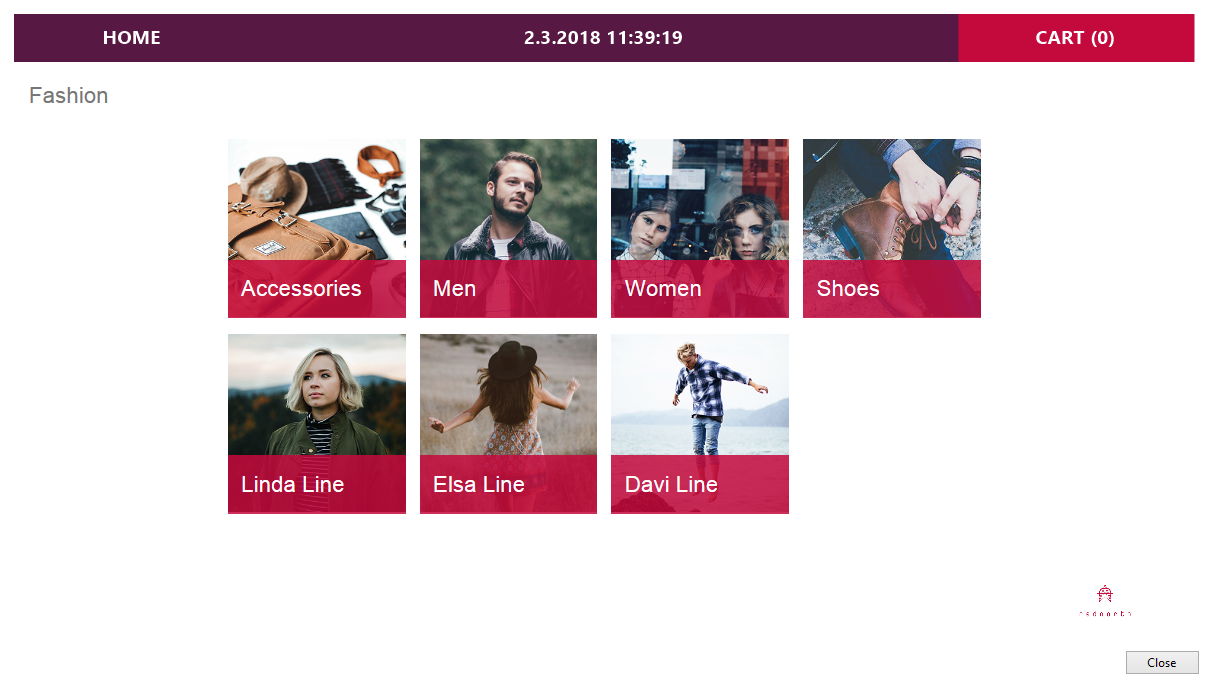
Note: The default Hierarchy Code for the Clienteling web template #BRICKVIEW is FASHION. You can change this by replacing FASHION with another hierarchy code in the Web Template in the Java script code (set as INITIAL_HIERARCHY_CODE).
You can also replace FASHION with #FromStoreSetup. Then the program selects the valid hierarchy in the store, based on the Sales Type Filter of the POS terminal and the current date and time.
The web template #BRICKVIEWHOSP uses the valid hierarchy in the store (INITIAL_HIERARCHY_CODE is #FromStoreSetup).
Note: In order to use images on the POS, you must make sure that you have enabled SOAP services for the service you are using.
See also
How to: Set Hierarchy for Web Store