When implementing a customization for a device, it is good practice to give the DLL and the class a different name than the default implementation already has.
This is so that your customers can use the default functionality for a normal OPOS device, and then also use your customized implementation for that special device that they also have.
In Step 1 below the referenced How to ... instruction gives the DLL a different name and describes how to build it to the correct folder. Note: Do not skip this step as it is very important to do this properly.
Note: The steps below are written for Visual Studio 2019. If you are using another version, it is possible that the operations, dialog windows, or buttons have a different location or name.
- Create a custom solution for your customization by following the instructions in How to: Create a Custom Solution for LS Hardware Station The following steps below assume that the steps in that topic have been done.
- It is also useful to go through the instructions in How to: Debug Existing Device Implementation Using LS Hardware Station, but not necessary.
- Make sure that you are running Visual Studio as an Administrator.
- Go to Services, and make sure that the LS Hardware Station is not running on your computer, stop it if it is already running.
- There are two ways to do an implementation:
- to use the existing implementation as described in How to: Debug Existing Device Implementation Using LS Hardware Station and only change the code that is not working as needed, or
- implement the device interface from scratch and write all the device functionality yourself. The steps below describe how to start both types of implementation.
- After following the How to ... instructions in Steps 1 and 2, you should have a solution with two projects, LSOposPrinter and MyPrinterDevice. Go to the MyPrinterDevice solution, and open the MyPrinterDeviceClass.cs file.
- Make the MyPrinterDeviceClass inherit from Device and IPrinter (public class MyPrinterDeviceClass : Device, IPrinter). You will see that the environment does not recognize the objects Device or IPrinter. These two objects are in the LSOposControls.DLL that you will need to add as a reference.
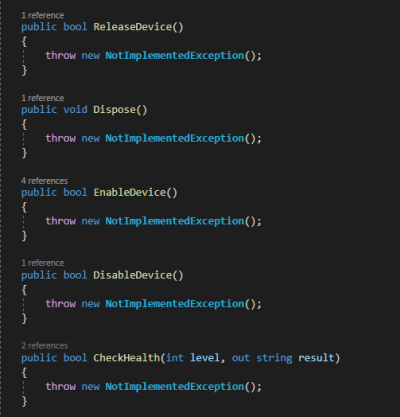
Note: Make sure that you add it from the ..\Source\LSOposControls folder where the LS Hardware Station is installed. Your Visual Studio should suggest that you need to add a using LSRetail.NAV.Opos to the using section of the cs file, but if it does not you need to add it manually. - Click the IPrinter term with the mouse, and then select Implement the interface in the options that are made available. This will add all the functions and properties that need to be implemented to the class with a NotImplementedException added to all function bodies. This means that when all the functions are called, an exception is thrown that will tell the caller that the function has not been implemented.
Note: If none of the standard functionality should be used, then this is the starting point for adding the new customized functionality. Any functions that should not be implemented in the customization should have the NotImplementedException removed.
Note: All functionality that the LS Hardware Station relies on will need to either be implemented or have the function return a default value.
- If the purpose is to use the standard functionality but change some part of the functionality, then the default implementation can be used and then only specific functions can be changed. Even when the original code is being used it is recommended that the DLL name and class name are changed to represent the customization, so that the user can create two different devices, that is using the standard functionality and the customized functionality. If they both have the same names, there can only be one DLL available to the user, which is either the standard functionality or the customized one.
- Go to the Printer.cs file in the LSOposPrinter project, and copy the entire code from the cs file. Go to the MyPrinterDeviceClass.cs and paste it over the entire code in that file. Then change the following:
- The namespace has to be reset to be MyPrinterDevice
- The class name has to be reset to be MyPrinterDeviceClass
- The constructor function name will also have to be changed to be MyPrinterDeviceClass
- The GetProperties function is casting the properties it finds to a Printer type, this type cast should be changed to be MyPrinterDeviceClass.
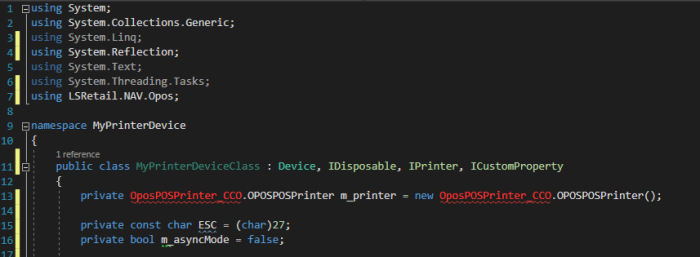
- As you can see in the image above, the OposPrinter_CCO is in red. This is because a reference to the Printer OPOS COM object is missing from the project. In order to have access to those objects, the machine that you are working on has to have the Curtis Monroe OPOS DLLs (which are installed with the LS Hardware Station).
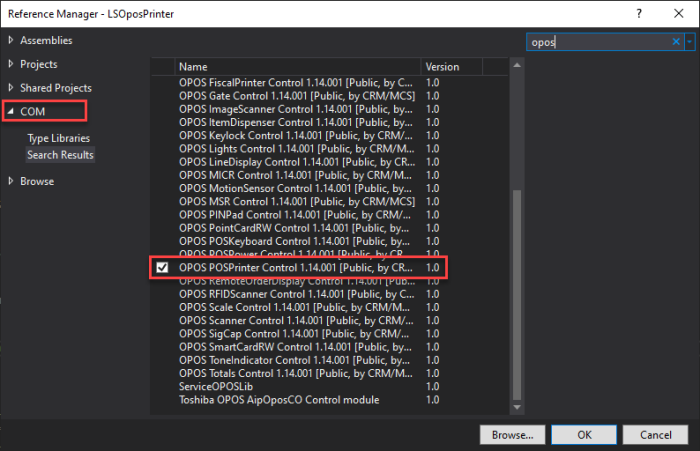
When adding a reference to a COM object through the Add Reference option, you need to select COM on the left of the dialog, Then you can search for OPOS and select the device that you want to work with in your customization. In this instance, it is the OPOS POSPrinter Control as shown in the image below:
- Any System references that are missing will also need to be added: most likely, the System.Reflection reference will need to be added through the Assemblies option in the Add reference dialog (see above).
- After making all these changes, you should be able to build the solution and you should have a MyPrinterDevice.DLL and LSOposPrinter.DLL in the C:\Program Files (x86)\LS Retail\LSHardwareStation\Devices\OPOS folder that has a current timestamp.
- Add a small change to the MyPrinterDevice project to show that the customization is working in the LS Hardware Station:
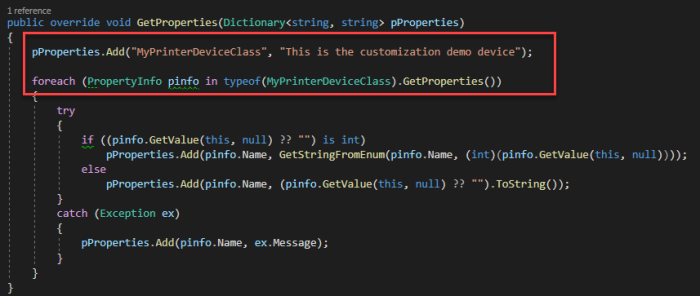
- Locate the GetProperties function in the MyPrinterDeviceClass.cs file.
- Add a line at the top of the function where you add a property to your device. See an example in the image below:
- Save the change, and press Start or F5 to run the solution using the LS Hardware Station.
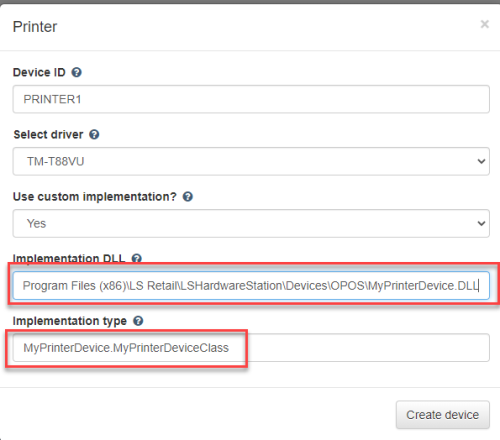
- Once the LS Hardware Station has started, go to the Management Portal (localhost:8088 in a browser), and create a new printer device using the customized DLL you just built (see How to: Configure the Custom Implementation DLL and Type), and make sure that you set the correct values in the Implementation DLL and Implementation type (<Namespace>.<Class name>).
- Select the new device, and click Load. If the device is loaded successfully, a green banner with the message "Device config updated" will be displayed in the Management Portal. If an error comes up, that usually has to do with the Implementation DLL and Implementation type values that were entered.
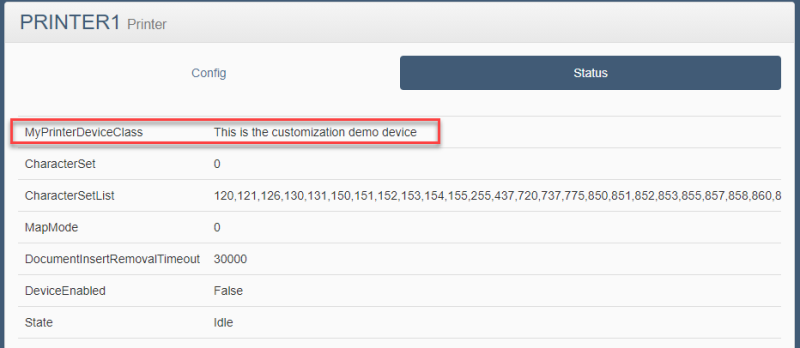
- Select the Status tab for the device. At the top of the list you should see the property values that you added in the GetProperties function:
It depends of course on the device and the customized functionality needed which functions need to be changed and how. These instructions are intended to help you configure and set up the development environment so that the customization, testing, and debugging can be done easily.
Note: Remember to change the Project Configuration to Release, when you are building for a production environment.
Error handling
Generally, all functions that can fail return a Boolean value to indicate success or failure of the function call. If the result is a failure, the function GetLastError should return a description of the error that occurred.
See also
How to: Create a Custom Solution for LS Hardware Station
How to: Debug Existing Device Implementation Using LS Hardware Station
How to: Configure the Custom Implementation DLL and Type