This topic explains the steps that are necessary to create a custom solution for LS Hardware Station. Everything you need to do in Visual Studio to create such a implementation from scratch will be explained in detail.
Create a solution in Visual Studio
Note: The steps below are written for Visual Studio 2019. If you are using another version, it is possible that the operations, dialog windows, or buttons have a different location or name.
Create a solution in Visual Studio
- Open Visual Studio as an administrator (that is use Run as Administrator when you open the Visual Studio app), and in the opening dialog window select Create new project.
- In the next dialog window, locate the Class Library (.NET Framework) template in the list of templates. Click Next.
- In the Configure your new project dialog window, set the Project name, Location, and Solution name. In these instructions the custom project will be referred to as MyPrinterDevice (see the image below). Make sure you select the Place solution and project in the same directory check box.
Tip: The location of the project can be anywhere you want to store your projects.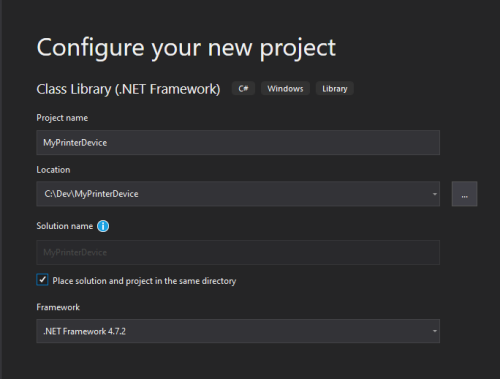
- Visual Studio should now open your solution with the name MyPrinterDevice, and in that solution is a project called MyPrinterDevice.
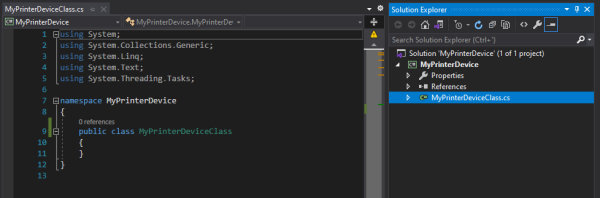
- Rename the default class name (Class1.cs) in the project to be MyPrinterDeviceClass.cs. Visual Studio will ask if you would like to rename all references: select Yes.
- You will now see that in the file MyPrinterDeviceClass.cs the class name is also MyPrinterDeviceClass.
- In order for the LS Hardware Station to "see" and use the MyPrinterDevice.dll, which is a product that you are creating, you must make sure that the DLL is copied to a a folder that the LS Hardware Station has access to and can load the DLL.
Right-click the MyPrinterDevice project, and select Properties. - Select the Build tab in the Properties dialog window.
In the Output path, select the path C:\Program Files (x86)\LS Retail\LSHardwareStation\Devices\OPOS (that should already exists because you should already have the LS Hardware Station installed).
You also need to make sure that you are running your Visual Studio app as an Administrator. - Right-click the MyPrinterDevice solution and select Build solution. In the Output section of the Visual Studio app you should see a line showing where the DLL was copied to once it was built (select the View menu, then Output, if the output section is not visible).
Go to C:\Program Files (x86)\LS Retail\LSHardwareStation\Devices\OPOS, and you should also see a new DLL there called MyPrinterDevice.DLL. - Go to Services, and make sure that the LS Hardware Station is not running on your computer, stop it if it is already running.
- In the project's Properties dialog window (see step 7), select the Debug tab. Set the Start external program to LSHardwareStation.exe in Program Files (see image below), and set Command line arguments to be -debug.
Save these changes, and select Start in Visual Studio or press F5. The LS Hardware Station should start. You will see a debug window with the log lines visible, and if you go to a browser and go to localhost:8088 the Management Portal should be up and running.

Note: If a error message comes up saying "A project with an Output type of Class Library cannot be started directly", the MyPrinterDevice is not set as a startup project. Right-click the MyPrinterDevice project, select Set as Startup Project, and try running the solution again.
- To stop the debugging session, click Stop in Visual Studio or press Shift+F5.
You have now created a solution that you can run in debug mode using your installed LS Hardware Station, but your new DLL is not loaded nor is it being used by the LS Hardware Station.
Error handling
Generally, all functions that can fail return a Boolean value to indicate success or failure of the function call. If the result is a failure, the function GetLastError should return a description of the error that occurred.
Next steps
How to: Debug Existing Device Implementation Using LS Hardware Station
How to: Implement a Custom Device for LS Hardware Station
See also
Microsoft Tutorial: Create an app using Visual Studio