When doing an implementation, it can be useful to see how the default implementation for a device is communicating and working with the LS Hardware Station.
Create a solution in Visual Studio
Add a device implementation to the solution
Because the source code for the standard device implementations comes with the LS Hardware Station, you can do this using Visual Studio.
Create a solution in Visual Studio
Follow the steps in How to: Create a Custom Solution for LS Hardware Station to create a custom solution and to configure it to run using LS Hardware Station. The steps below assume that you have already completed the steps in that topic.
Note: The steps below are written for Visual Studio 2019. If you are using another version, it is possible that the operations, dialog windows, or buttons have a different location or name.
Add a device implementation to the solution
- Make sure that you are running Visual Studio as an Administrator.
- Go to Services, and make sure that the LS Hardware Station is not running on your computer, stop it if it is already running.
- Go to the C:\Program Files (x86)\LS Retail\LSHardwareStation\Devices\Source folder, and copy the LSOposPrinter folder to your development folder.
- Right-click the solution, and select Add - Existing project. Find the project file that you just copied in the previous step, for LSOposPrinter.csproj.
Note: You can also add the project directly from the source folder where the LS Hardware Station is installed, but we recommend copying the project folder as described in the step above. - You should now have two projects in your solution: LSOposPrinter and MyPrinterDevice.
- Open the References list for LSOposPrinter project. You should see at least one reference with a triangle on it: LSOposControls. Remove this reference, and add it again (right-click References and select Add) using the LSOposControls.dll that is in C:\Program Files (x86)\LS Retail\LSHardwareStation\Devices\Source\LSOposControls.
- Right-click the LSOposPrinter project, and select Properties. Go to the Application tab, and click Assembly Information. Set the Title to be LSOposPrinter - Customized.
- In Visual Studio find the Printer.cs file in the LSOposPrinter project, open it by double-clicking, find function public bool OpenDevice, and put a breakpoint in the first line (F9).
- Build the solution: right-click the solution and select Build solution or press F6.
- If you get build errors about Newtonsoft.Json not being compatable with your solution, then you are not referencing the correct LSOposControls.DLL. Make sure it is being referenced from the path mentioned in the previous step.
- The project already has a Post-build event configured that will move the built DLL to the C:\Program Files (x86)\LS Retail\LSHardwareStation\Devices\OPOS folder. After a successful build, you should be able to see a LSOposPrinter.dll with the current date and time in that folder.
- Right-click the LSOposPrinter.DLL in the C:\Program Files (x86)\LS Retail\LSHardwareStation\Devices\OPOS folder, and select Properties. In the dialog window, select the Details tab. Here the File description should be LSOposPrinter- Customized.
- Save these changes, and build the solution again: right-click the solution and select Build solution, or press F6.
Go to folder C:\Program Files (x86)\LS Retail\LSHardwareStation\Devices\OPOS and right-click the LOposPrinter.DLL, select Properties. In the Properties dialog window, select the Details tab. You should see under File description the text that you entered in the previous step.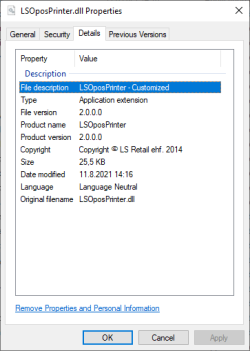
Note: Adding this description to the customized DLLs is not necessary, but it does help later on if and when it is necessary to confirm if the correct customization DLL is at a customer site.
- Go back to the Visual Studio, and select Start or press F5. The LS Hardware Station should start, you will see a debug window with the log lines visible and if you go to a browser and go to localhost:8088, the Management Portal should be up and running.
Note: If an error message comes up saying "A project with an Output type of Class Library cannot be started directly" , then either none of the projects are configured to start the LS Hardware Station or the project that is, is not configured as the Startup project. Go to How to: Create a Custom Solution for LS Hardware Station to see the steps necessary to configure this properly. - If you already have an OPOS printer configured, the solution should stop in the public bool OpenDevice function in the LSOposPrinter.Printer.cs file, because you already set a breakpoint there. If you do not have an OPOS printer configured, create a new one in the Management Portal (see How to: Add a Device to Management Portal) and the breakpoint will be activated.
- By adding breakpoints to various functions within the device implementation (in this case the Printer.cs), you can see how the standard functionality works and how and when the communications between LS Hardware Station and the device implementations are done.
Note: The Virtual devices will not work with testing customized implementations as they are themselves a customization of the default functionality of each device.
Error handling
Generally, all functions that can fail return a Boolean value to indicate success or failure of the function call. If the result is a failure, the function GetLastError should return a description of the error that occurred.
Next steps
How to: Implement a Custom Device for LS Hardware Station
See also
How to: Create a Custom Solution for LS Hardware Station
How to: Configure the Custom Implementation DLL and Type