You can allocate extra tables, change a table allocation, and cancel a table allocation.
You can do this from the Dining Table Allocation panel on the POS:
- the Reservation/Waiting List grid - where change and cancellation applies to all allocated tables.
- the Timeline matrix - where change and cancellation applies to the selected table only .
From the Reservation/Waiting List grid
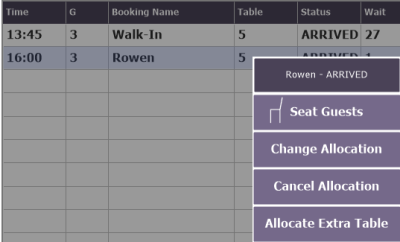
To allocate an extra table
- Select the desired reservation entry row that already has a table allocated and the Table column. The dining table list now shows the dining table(s) allocated to the entry.
- Select Allocate Extra Table from the drop-down list.
- Allocate another table. This dining table is now also allocated to this reservation entry.
To change all allocated tables
- Select the desired reservation entry row and the Table column. The dining table list now shows the dining table(s) allocated to the entry.
- Select Change Allocation from the drop-down list. The system cancels the current table allocation (all tables).
- Allocate another table. Only this dining table is now allocated to this reservation entry.
To cancel all allocated tables
- Select the desired reservation entry row and the Table column. The dining table list now shows only the allocated tables.
- Select Cancel Allocation from the drop-down list. The system cancels the current table allocation (all tables).
From the Timeline interval matrix
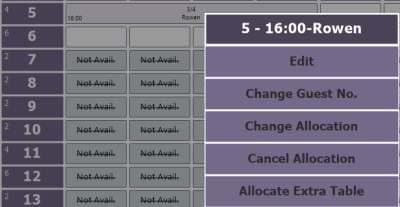
To allocate an extra table
- Select the interval button that shows the reservation entry. The reservation grid now points to the reservation entry.
- Select Allocate Extra Table from the drop-down list.
- Allocate another table. This dining table is now also allocated to this reservation entry.
To change an allocation (one table only)
- Select the interval button that shows the reservation entry (if there is more than one table allocated, select the one you want to change, you can only change one at a time). The dining table list now shows the dining table(s) allocated to the entry.
- Select Change Allocation from the drop-down list. The system cancels the selected table allocation.
- Allocate another table. This dining table is now allocated to this reservation entry.
To cancel an allocation (one table only)
- Select the interval button that shows the reservation entry (if there is more than one table allocated, select the one you want to cancel, you can only cancel one at a time). The dining table list now shows only the allocated tables.
- Select Cancel Allocation from the drop-down list. The system cancels the selected table allocation.