The Lookup in POS with filtering
The Lookup in POS is easy to use to find items and put them into the sale.
The Lookup in POS - Reset option
The Lookup in POS - Inventory option
When the Lookup command opens, by default the POS opens a panel with four areas:
- Input field.
- Here the user can insert text to use in next step for the lookup command.
- Information area to display messages for the user.
- Another panel within the #LOOKUP panel. This is where all the lines in the lookup are displayed.
- Menu with commands.
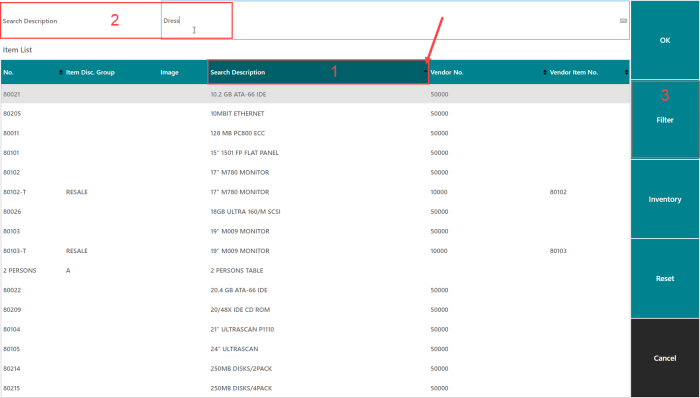
Example of how Lookup is used in the POS:
- Open your POS and use the Lookup button, sometimes this button is called Item Lookup.
- Press the Search Description column header to select that column for searching and filtering. The selected column header is highlighted and a little arrow glyph shows the sorting order.
- In the Input field, enter your search text, for example Dress. Note: This search can only search for exact text.
- Click the Filter button. Note: Using Enter on the keyboard activates Filter by default.
-
Lookup now displays items that have Dress in their description, no matter where in the description.

- Here the user can select the item he or she wants to put into the sale, and then use the OK button.
Note: In Lookup it is possible to select one or many items. Note: The selected lines are displayed differently than the active line.
The Lookup in POS - Reset option
This use case shows how to reset while working with Lookup.
- Open your POS, and click the Lookup button.
- Press Search Description, and enter your search text.
- If you change your mind in the middle of the process, and decide to do something different in this panel, click the Reset button.
- Continue to use Lookup as before.
The Lookup in POS - Inventory option
One of the benefits of the Lookup option is the possibility to see how much is in stock for an item.
Example:
- Open your POS, and click the Lookup button.
- Find the item you want to see the stock for:
- Use the Filter options or scroll down for the item.
- This example is looking for item 40170.
- Select the line.
- Select the Inventory button.
- The inventory for the item is displayed for the store group your store belongs to.
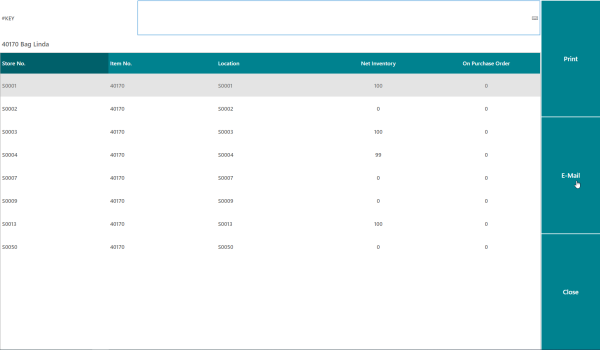
- In this option, you have a choice of printing the information or sending it by email.