The installation process requires the following information:
- SQL Server instance (for example, mySqlServer or mySqlServer\MSSQLSERVER) used to create the LS Commerce database.
- Default collation used is: COLLATE Latin1_General_CI_AS. If another collation is to be used, create a new LS Commerce Service database with the required collation in SQL Management Studio. The setup uses the existing database.
- LS Nav/Central SQL Server instance (for example, MySQLServer)
- LS Nav/Central SQL database name (for example, LSCentral)
- LS Nav/Central company name (for example, CRONUS - LS Retail)
- URL to LS Nav/Central web service (http://localhost:7047/BCxxx/WS/CRONUS - LS Central/Codeunit/RetailWebServices)
- Windows user name and password used for the Windows Authentication against the LS Nav/Central web service.
Run the setup program LSCommerce.Service.Central.Setup.4.x.exe.
The setup creates the LSCommerceService service in IIS and the LS Commerce database. You can run the setup multiple times to update and to recreate and override objects in the existing LS Commerce database.
Installation options
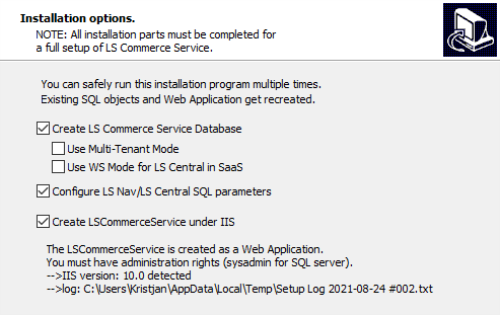
Select check boxes depending on the type of installation. For updating an existing installation, clear all check boxes, and only the files will be updated but the configuration and database will stay the same.
Note: When you are switching LS Commerce Service modes (for example single-tenant to multi-tenant), uninstall LS Commerce Service and install again with the new settings.
Installation options:
- Create LS Commerce Database. Select this check box to update the database. (Note: when updating, all existing data will be deleted.)
- Use Multi-Tenant Mode enables multi-tenancy to use one LS Commerce Service to communicate with multiple LS Central instances. Configurations for LS Central tenants are configured in the Commerce Admin Portal instead of the usual AppSettings.config file. See Commerce Admin Portal for more information.
- Use WS Mode for LS Central in SaaS is used when LS Central is in SaaS and it only uses LS Central Web Services to retrieve data. No Direct access to LS Central database.
- Configuration needed to connect to LS Central SQL Database. Not used in SaaS or Multi-Tenant mode.
- Must run locally on the IIS machine.
- Creates a new Web Application called LSCommerceService.
- Creates a new application pool called LSCommerceServicePool. The LSCommerceService worker process runs under the identity set in this application pool.
SQL Server database for LS Commerce Service
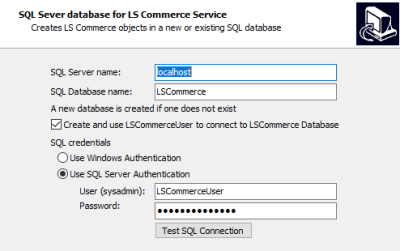
This will create an LSCommerce Database.
- Type in an SQL Server name where the database will be located, and either use the default database name or change it.
- Select the Create and use LSCommerceUser to connect to LS Commerce Database check box to let setup create LSCommerceUser with default password LSCommerceUser and use that user as login for the LSCommerce database. If this check box is not selected, the SQL credentials will be used to connect to LSCommerce database.
- SQL credentials are used to create the database and run other scripts during the setup process. This user has to be sysadmin on the SQL Server to be able to create the database. If Windows Authentication is used, the user logged in to the host and running the setup needs to be sysadmin on the SQL Server.
The Test SQL Connection button tests the SQL credentials provided for the SQL Connection.
LS Central SQL Server Database used by the LS Commerce Service
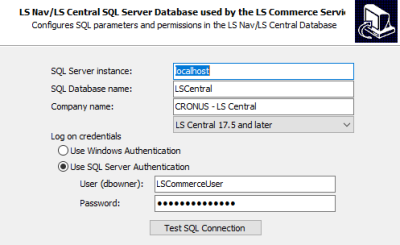
SQL Server connection setting used to connect directly to on-premises LS Central Database.
- SQL Server instance
- SQL Database name
- Company name
- Select the appropriate LS Central version range depending on which version you are connecting to.
- Choose the Log on credentials to use to access the LS Central Database. The user has to have read access to all the tables needed to get data from.
The Test SQL Connection button tests the SQL credentials provided for the SQL Connection.
IIS Web Application setup

IIS Web Application Service settings for where LS Commerce Service will installed.
- Web Site name: The IIS Web Site to which LS Commerce Service will be added.
- Web Service name: Name for LS Commerce Web Service. If you are installing more than one instance of LS Commerce Service, choose a different name for each instance.
LS Central Web Service configuration.
- Web Service URL: Web Service URL for RetailWebServices that you created in LS Central. See Before Installation.
- User name: For on-premises, enter a valid LS Central user with access to use the Web Service. For SaaS setup, enter the user name used when creating the Web Service URI
- Password/WebKey: For on-premises, enter the password for the LS Central user. For SaaS setup, enter the Webkey from the admin user.